Basic Analytics Setup After a Launch of a New Site


Are you launching a new site? This is what you should do in terms of web analytics and related tools just before or just after you launch it.
Steps:
- Create a Google Analytics Property and Configure It
- Basic Settings
- Block Spam Traffic
- Block Internal Traffic
- Set up Internal Search in Google Analytics
- Exclude Payment Gateway
- Set Up Your Time Zone Properly
- Set up Conversion Tracking
- Set up Checkout Process Tracking or Enhanced Ecommerce
- Measure 404s – Page Not Found Errors
- Set up Content Grouping
- Make Sure You Tag Every Email
- Use Google Tag Manager to Deploy All the Code
- Verify Your Site for Google Search Console
- Sign Up for Advertising Accounts and Add Their Tracking Codes Right Now
- Connect the Accounts Together
- (Additional Resources and Similar Checklists)
Create a Google Analytics Property and Configure It
If you don’t have a Google Analytics property yet, go ahead and create it. Out of the box setup is not enough, you need to do at least these extra steps:
Basic Settings
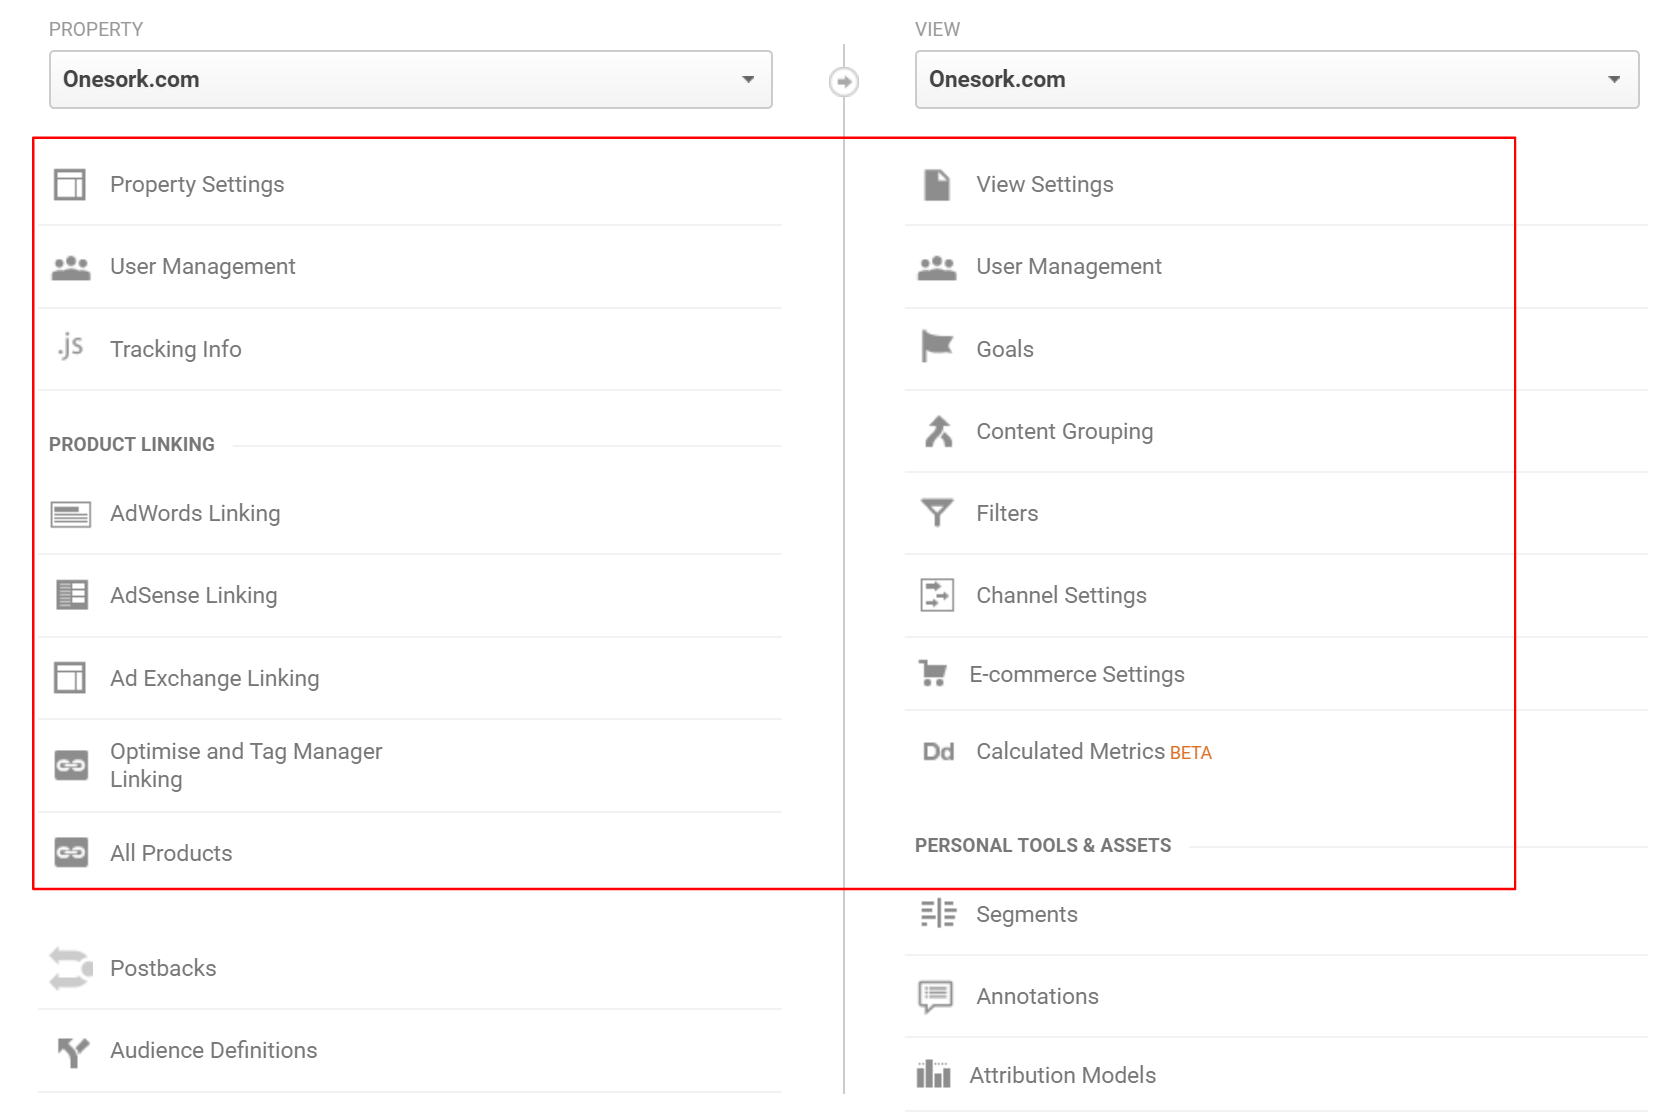
Take a look at the property settings. You may want to enable “Demographics and Interest Reports” or check whether you are using the right currency.
Just go through the settings pages on PROPERTY and VIEW level and setup accordingly.
If your site isn’t brand new and you are just redesigning your old one, add a note to Google Analytics, so you know when the redesign launched.
Furthermore, you need to pay closer attention to a few things described below.
Block Spam Traffic
Google Analytics finally does a pretty good job in filtering spam traffic, but you should still set up at least a simple filter that will allow only hits from your own domain. You can find detailed directions in the first part of this article: How Bloggers Can Avoid Spam in Their Google Analytics Reports. If you use a staging environment (and you should), this will also filter out that testing traffic.
Of course make sure you have activated spam bot filtering in Analytics (Admin -> View Column -> View Settings):

Block Internal Traffic
Since we are playing with filters already, it’ll be beneficial to set up a filter for internal traffic (your own IP and the IP of your co-workers).
If you Google “show my ip”, it’ll display your public IP address that you can filter out easily (this How To will help you).
Woo-hoo! Now your Google Analytics data won’t be skewed by your own visits.
If you want to go one step further, you can set up an additional Google Analytics View for internal visits only – that way you’ll be able to do your tests (testing conversion tracking setup etc.) in your own internal playground without affecting the main view.
Does your IP address change frequently? Are you looking for a simpler way of blocking internal traffic? There are browser extensions for Google Chrome that will do that for you at the browser level. This one worked for me: Block Yourself from Analytics.
Set up Internal Search in Google Analytics
Google Analytics lets you measure how visitors interact with internal search on your site. If you have internal search on your site, you should definitely activate this setting. It’s easy to set up and over time it gives you plenty of ideas for site improvements. Here you can find a detailed step by step guide on how to enable internal search measurement in Google Analytics.
Exclude Payment Gateway
Does your site process transactions using a payment gateway such as PayPal? If it does, users are usually redirected to the payment gateway to complete their transaction. When the transaction has been completed, they are redirected back to your site.
By default this would be seen as referral traffic in Google Analytics, skewing your statistics significantly.
There is a simple fix – add the payment gateway to your Referral Exclusion List.
Set Up Your Time Zone Properly
Choose the right time zone in Google Analytics (Admin -> View Settings) and make sure you use the same one in your other accounts (AdWords, Facebook Ads etc.). That way the stats can match across multiple accounts.
Set up Conversion Tracking
You definitely need to set up at least one conversion goal – it could be a lead form submission, e-commerce sale or even going to a contact page which has details about your brick and mortar store.
If users are redirected to a confirmation page after they complete a conversion, it’ll be easy to set up. Just go to “Goals” in Google Analytics admin and add the URL there:
Nowadays, many forms don’t redirect you to a new page – the data is sent in the background and only a confirmation prompt is displayed.
If that’s the case, you’ll need to add a custom code that will trigger an event in Google Tag Manager. You can read this awesome article on how to set up form tracking in GTM that explains the different approaches that you can use (my preferred option is #5 in the article, but you can choose whatever is suitable in your situation).
Set up Checkout Process Tracking or Enhanced Ecommerce
If your conversion has multiple steps, consider tracking each step so you can see when your users drop off.
If you have an e-commerce store, you can go even further and set up enhanced e-commerce tracking.
Having this additional data may be beneficial in the future, but consider your strategy to see whether it’s worth the additional investment.
Measure 404s – Page Not Found Errors
Google Search Console lets you identify 404s that Googlebot runs into, but it’s easy to also track it from the point of view of users.
Make sure your Google Analytics code is included in the source code of the page and make sure you can filter statistics for these pages easily.
Optionally, set up an alert to your email in case there is a significant increase in hits to the error pages.
For more details, head over to my article on how to create a 404 report in Google Analytics. It also includes a step-by-step guide on setting up notifications.
Set up Content Grouping
This is probably the most underestimated setting, yet truly beneficial to set up right from the start.
Content grouping lets you look at the flow of visitors from the perspective of groups that you create and not only for individual URLs.
You can set up a content group for your articles, product pages, categories, dedicated landing pages…
With that set up you can easily see bounce rates of different groups, pageviews, user flows etc.
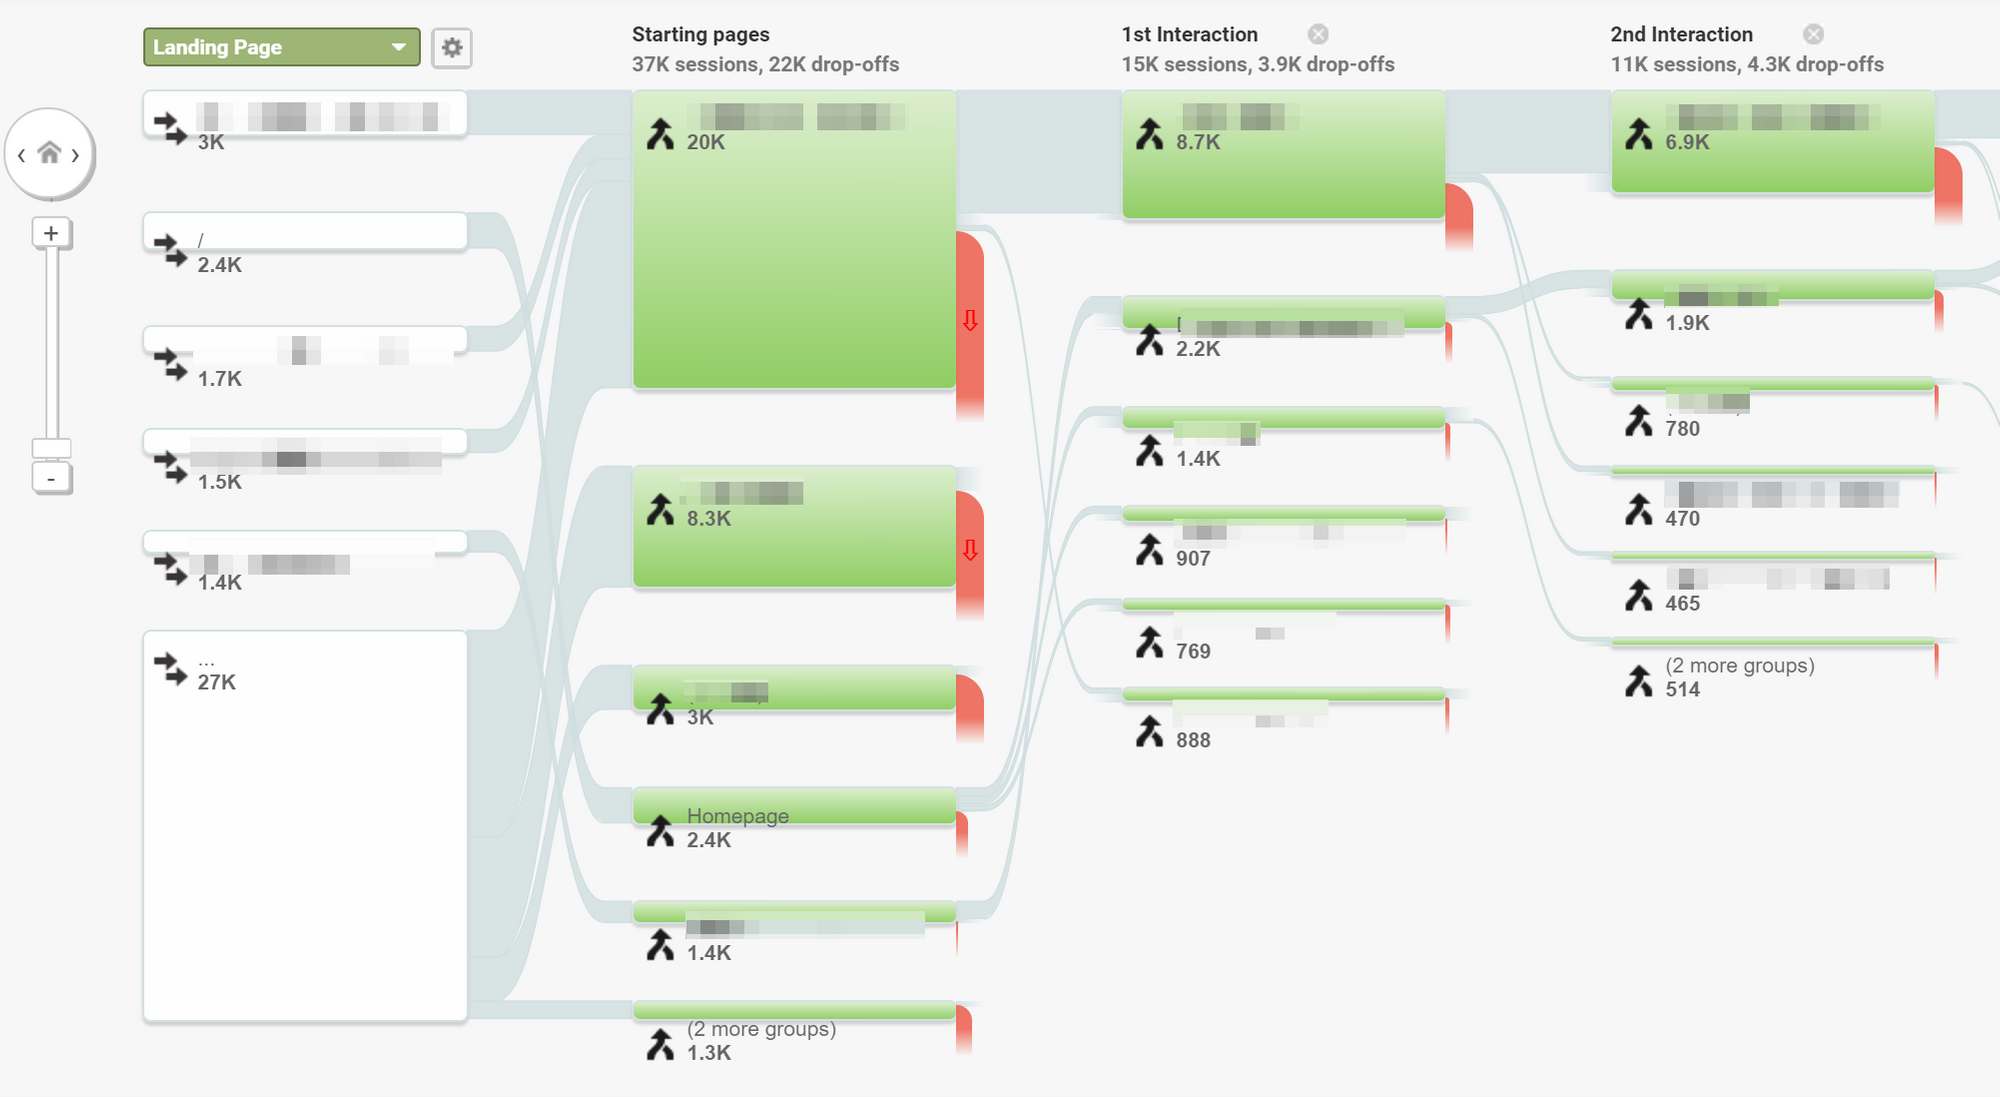
It can be sometimes hard to see the bigger picture in the mess of all the URLs and content grouping helps with that.
Content groups start to populate after you set these groups up so that’s another reason to do that right away.
With content grouping you can make the Behavior Flow report finally useful:
Make Sure You Tag Every Email
If you send out any emails, it’s necessary to track all of them. If you’ve set that up correctly, you’ll be able to see how these e-mail messages affect your traffic and sales.
Make sure you track both newsletters and transactional emails (order confirmation, order status).
You can do that by tagging URLs with UTM parameters.
Use Google Tag Manager to Deploy All the Code
Sign up for Google Tag Manager and create a new GTM container. Add the GTM container to your source code and use it to deploy the Google Analytics code to the site.
This will make all the future updates much simpler.
If you aren’t familiar with GTM yet, this article will help you with the basic setup.
Verify Your Site for Google Search Console
Open Google Search Console and add your site as a new property. If you are doing a redesign, make sure that the verification method is still active so you won’t lose access.
When adding a new site to GSC pay attention to the URL that you use – you can have these versions of URLs:
For Google these are 4 different properties (websites).
When signing up for GSC, make sure you insert the right URL, otherwise you’ll see only partial data.
The same applies if you are making the switch from HTTP to HTTPS. If that’s the case, you need to create a new property for the HTTPS version because all the new data will be only there.
Once you’ve activated your new GSC, browse through the interface and set everything up. If you have a larger site, make sure you add a link to your sitemap.xml feed (Crawl -> Sitemaps).
Sign Up for Advertising Accounts and Add Their Tracking Codes Right Now
Even if you don’t plan on using paid advertising from the beginning, you’ll probably need it at some point in the future.
In paid advertising you’ll often use something that’s called “custom audiences” – these contain, for example, previous visitors of your site, previous customers, engaged visitors etc.
By using well designed custom audiences you can significantly lower your ad costs and improve the performance of your ads.
My advice is always to set up these custom audiences as soon as possible, because they may take some time to populate (depending on your traffic).
Once you decide that you want to use paid advertising (and you should almost always include paid advertising into the mix to same extent), you’ll be really happy that you can use the audiences that you’ve prepared and are ready to use.
No more waiting a couple of months for highly targeted audiences to populate.
So which ones to use?
- Google AdWords – create at least an audience with all visitors for a long period (e.g. 180 days) and a custom audience that will include all your converting users.
- Facebook Ads – implement Facebook pixel and create an audience with all visitors (180 days) and all your converting users. This will also allow you to create similar audiences. Facebook works well with Google Tag Manager making the implementation really easy and coding-free.
- LinkedIn Ads – Whaat? I don’t want to advertise on LinkedIn! Well, even if you don’t want to use LinkedIn Ads, you can take advantage of LinkedIn’s detailed information about their users. After you implement LinkedIn Insight Tag, you’ll be able to see information about job titles, seniority, company sizes of your visitors and more. It’s free to use, you don’t need to run any ads to be able to see it. (More info: LinkedIn’s Website Demographic Information: What You Need to Know)
Connect the Accounts Together
Finally, connect Google Search Console and AdWords with Google Analytics. That way you’ll be able to see organic and paid search data in Google Analytics.
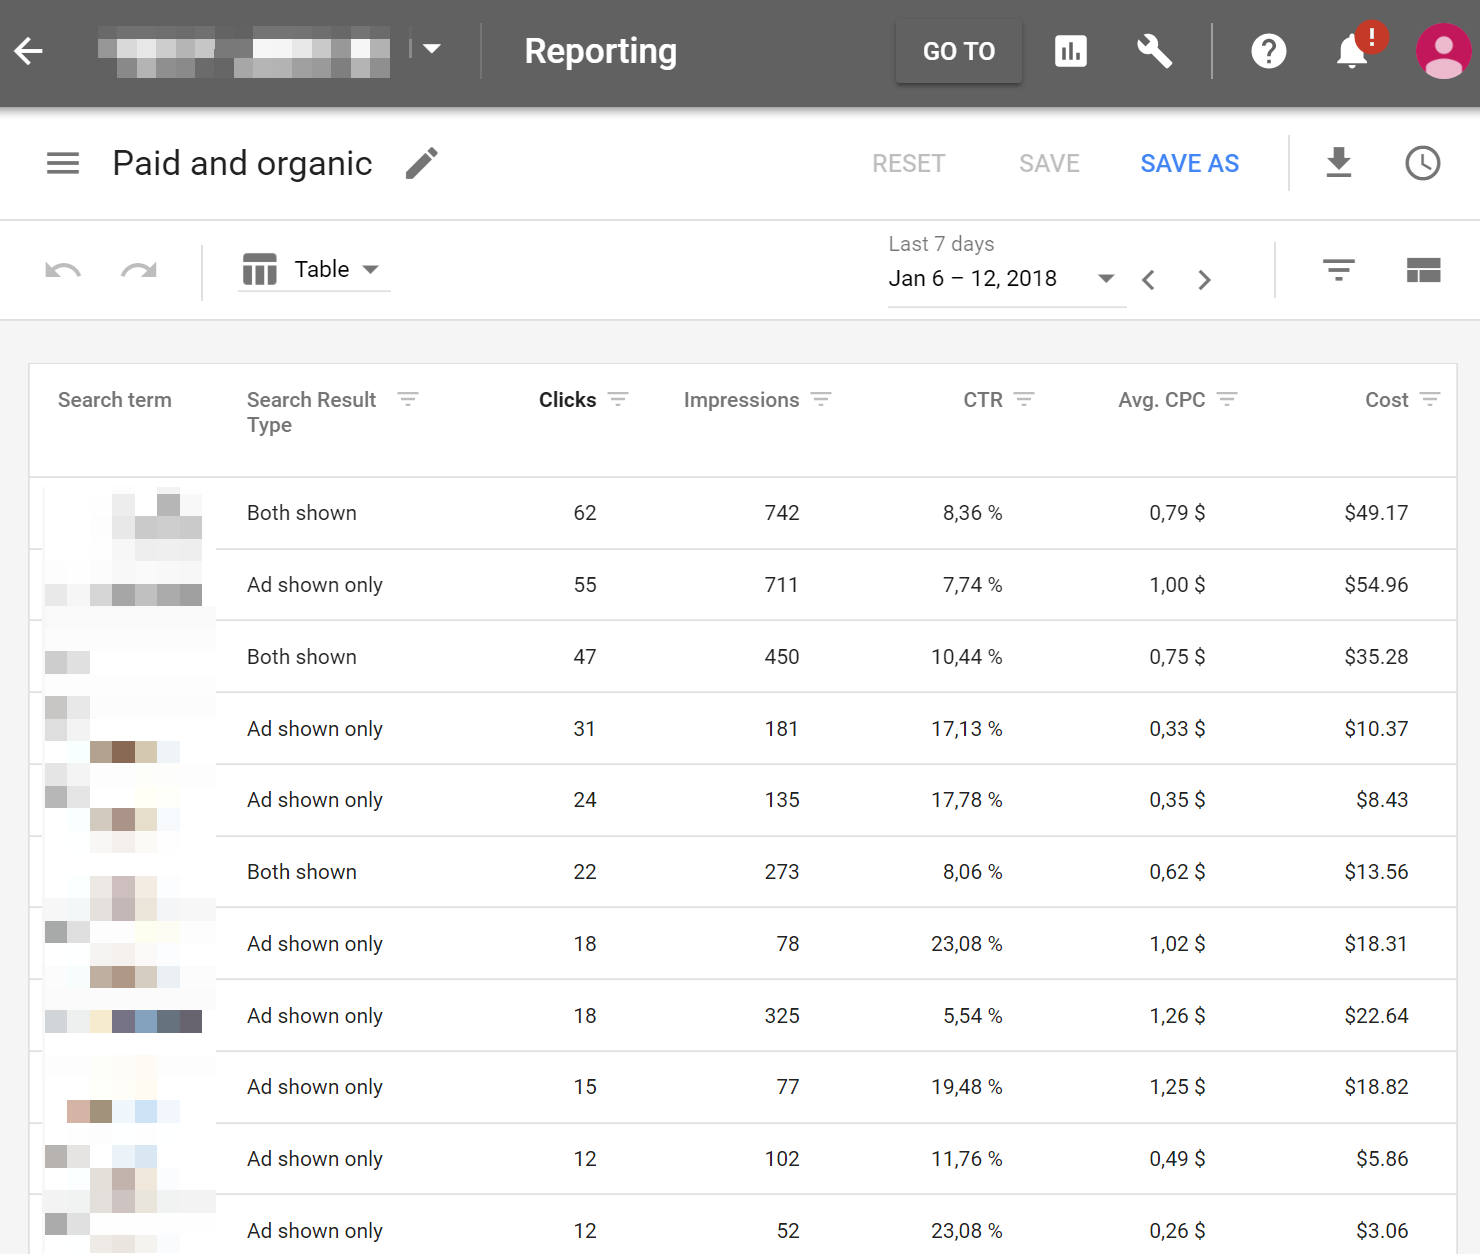
Also go to Google AdWords and connect it with Google Search Console. This additional connection gives you the opportunity to use the Paid and Organic reportthat you can find among basic preset reports in AdWords.
It helps you easily spot your strengths and weaknesses in search: